

Let’s play with AI.
こんにちは。
AI coordinator管理人の清水秀樹です。
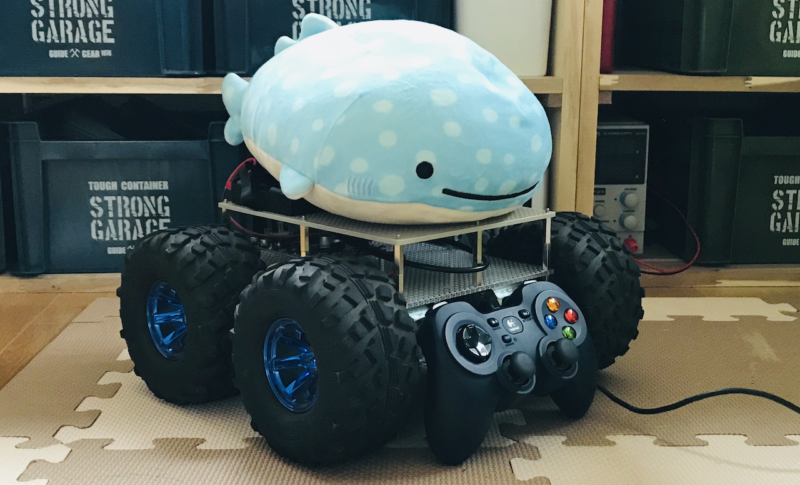
人気のコーナー「外でも動く遠隔操作AIロボットを作ろうpart02:Arduino編」に続き、part03:joystick編です。
part01、part02を見ていない方は以下の動画でご確認頂けます。
今回のpart03も動画で紹介しています。
是非参考にしてみてください。
joystickでタイヤを動かしてみよう。
前回はarduino IDEのシリアルモニタからタイヤを動かしました。
今回はjoystickを使ってタイヤを動かしてみたいと思います。
使用したjoystickはこちらです。
では、早速arduinoに書き込むソースコードの紹介です。
test.ino
/*
 * This example shows how to control MDDS30 in Serial Simplified mode with Arduino.
 * Set MDDS30 input mode to 0b11001100
 * Open Serial Monitor, set baudrate to 9600bps and "No line ending".
 * Send 0: Left motor stops
 *      1: Left motor rotates CW with half speed
 *      2: Left motor rotates CW with full speed
 *      3: Left motor rotates CCW with half speed
 *      4: Left motor rotates CCW with full speed
 *      5: Right motor stops
 *      6: Right motor rotates CW with half speed
 *      7: Right motor rotates CW with full speed
 *      8: Right motor rotates CCW with half speed
 *      9: Right motor rotates CCW with full speed
 *
 * Note: This example also compatible with MDDS10 and MDDS60
 *
 * Hardware Connection:
 *   Arduino Uno    MDDS30
 *   GND ---------- GND
 *   4 ------------ IN1
 *
 * Related Products:
 * - SmartDriveDuo-30: http://www.cytron.com.my/P-MDDS60
 * - CT UNO: http://www.cytron.com.my/p-ct-uno
 * - DC Brush Motors: http://www.cytron.com.my/c-84-dc-motor
 * - LiPo Battery: http://www.cytron.com.my/c-87-power/c-97-lipo-rechargeable-battery-and-charger
 * - Male to Male Jumper: https://www.cytron.com.my/p-wr-jw-mm65
 *
 * URL: http://www.cytron.com.my
 */

#include <SoftwareSerial.h>
#include <Cytron_SmartDriveDuo.h>
#define IN1 4 // Arduino pin 4 is connected to MDDS60 pin IN1.
#define BAUDRATE  9600
Cytron_SmartDriveDuo smartDriveDuo30(SERIAL_SIMPLFIED, IN1, BAUDRATE);

float motor_L;
float motor_R;
signed int speedLeft, speedRight;

void setup()
{
  Serial.begin(9600);
}

void loop()
{
  if (Serial.available()) {

    String motor = Serial.readStringUntil('z');
    //Serial.println(motor);

    int kg = motor.indexOf(",");
    //Serial.println(kg);
    int length = motor.length();
    //Serial.println(length);

    float motor_updown = motor.substring(0, kg).toFloat();
    float motor_LR     = motor.substring(kg + 1 , length).toFloat();

//    Serial.println(motor_updown);
//    Serial.println(motor_LR);

    if (motor_updown == 0.0 && motor_LR > 0.0) {
      motor_L = motor_LR;
      motor_R = -motor_LR;

    } else if (motor_updown == 0.0 && motor_LR < 0.0) {
      motor_L = motor_LR;
      motor_R = -motor_LR;

    } else if (motor_updown > 0.0 && motor_LR > 0.0) {
      motor_L = motor_updown;
      motor_R = 0;

    } else if (motor_updown < 0.0 && motor_LR > 0.0) {
      motor_L = 0;
      motor_R = motor_updown;

    } else if (motor_updown > 0.0 && motor_LR < 0.0) {
      motor_L = 0;
      motor_R = motor_updown;

    } else if (motor_updown < 0.0 && motor_LR < 0.0) {
      motor_L = motor_updown;
      motor_R = 0;

    } else {
       motor_L = motor_updown;
       motor_R = motor_updown;
    }

    speedLeft  = motor_L * 100;
    speedRight = motor_R * 100;

    smartDriveDuo30.control(speedLeft, speedRight);

    Serial.flush();
  }
}
続いてPC側のjoystickソースコードです。
こちらはpythonを使用します。
joystick_serial_motor.py
import pygame
from pygame.locals import *
import time
import serial

#シリアル通信(PC⇔Arduino)
ser = serial.Serial()
ser.port = "COM4"     #デバイスマネージャでArduinoのポート確認
ser.baudrate = 9600 #Arduinoと合わせる
ser.setDTR(False)     #DTRを常にLOWにしReset阻止
ser.open()            #COMポートを開く

joy_list =  [[0]*3]*3

pygame.joystick.init()
try:
    j = pygame.joystick.Joystick(0) # create a joystick instance
    j.init() # init instance
    print ('Joystickの名称: ' + j.get_name())
    print ('ボタン数 : ' + str(j.get_numbuttons()))
#キーが押されたフレーム時間を記録するリストを生成
    key_list =[0]*j.get_numbuttons()
except pygame.error:
    print ('Joystickが見つかりませんでした。')

def main():
    pygame.init()
    frametime = 0
    x,y =0,0
    while 1:

        for e in pygame.event.get(): # イベントチェック

            if e.type == QUIT: # 終了が押された?
                return
            if (e.type == KEYDOWN and
                e.key  == K_ESCAPE): # ESCが押された?
                return
            # Joystick関連のイベントチェック

            #Joystick
            if e.type == pygame.locals.JOYAXISMOTION:

                joy_list[x][y]  =   pygame.time.get_ticks() - joy_list[x][y]
                print('joystick')

                L_stick_LR = '{:.1f}'.format(j.get_axis(0))
                L_stick_updown = '{:.1f}'.format(j.get_axis(1))
                #符号変換
                L_stick_updown = float(L_stick_updown) * -1
                L_stick_updown = str(L_stick_updown)

                R_stick_LR = '{:.1f}'.format(j.get_axis(4))
                R_stick_updown = '{:.1f}'.format(j.get_axis(3))

                back_button = '{:.1f}'.format(j.get_axis(2))
                print('左スティック:', L_stick_updown, L_stick_LR)
                print('右スティック:', R_stick_updown, R_stick_LR)
                print('バックスティック:', back_button)

                L_stick = L_stick_updown + ',' + L_stick_LR + 'z'

                print(L_stick.encode())
                ser.write(L_stick.encode())

            #十字キー
            elif e.type == pygame.locals.JOYHATMOTION:
                #print ('hat motion')
                x,y = j.get_hat(0)
                joy_list[x][y]  =  pygame.time.get_ticks()
                cross_key = str(float(y)) + ',' + str(float(x)) + 'z'

                print(cross_key.encode())
                ser.write(cross_key.encode())

            #各種ボタン押下
            elif e.type == pygame.locals.JOYBUTTONDOWN:
                print (str(e.button)+'番目のボタンを押した')
                key_list[e.button] = pygame.time.get_ticks()

            #各種ボタン離脱
            elif e.type == pygame.locals.JOYBUTTONUP:
                print('ボタン'+str(e.button)+'を離した')
                key_list[e.button] = pygame.time.get_ticks() - key_list[e.button]
                #print("frame : " + str(key_list[e.button]/1000*60 ))

if __name__ == '__main__':
    main()

    ser.close()           #COMポートを閉じる
上記2つのソースコードはgithubでも公開しています。
joystickの十字キーと左スティックを動かしたときにタイヤが回れば成功です。
次回はmqttを使ったpubとsubについて説明します。
それではまた!


この記事へのコメントはありません。